Technical documentation
You will find in this technical documentation how the various software are used together and how they are connected. You will also find information about how to install them and configure your audio in Reaper.
Requirements
- at least one computer
- NINJAM client, comes for free with Reaper
- a web browser that can run Mozilla Hubs
- an instrument or instruments (and the ability to run the instruments into Reaper)
- (optionnaly) a browser compatible webcam in order to be seen by the audience in the 3D environment (hubs)
Audio video pipeline for musicians
4 different software are used in order to participate as a musician:
- Reaper/Ninjam for sending and hearing others musicians. It also provides the synchronized metronome that need to be displayed in order to follow the score. Ninjam also has a chat system.
- Dynamic score (in a web browser window) in order to follow the piece
- Mozilla Hubs (in a web browser window) in order to see and navigate into the 3D virtual world
- BBB (in a web browser window) for video conferencing. Keep it muted, but this will constitute a mosaic to be displayed in the 3D virtual space
                       -----------------
audio device -------> | Reaper/Ninjam   |-----------------> 1 window on your screen
                       -----------------                    audio device

                       ------------------------------
webcam       -------> | Web Browser                  |
(audio from           | 1) videoconference with BBB  |----> 3 separate windows
webcam or             | 2) virtual 3D env. with hubs |      on your screen
audio device)         | 3) dynamic score display     |
                       ------------------------------
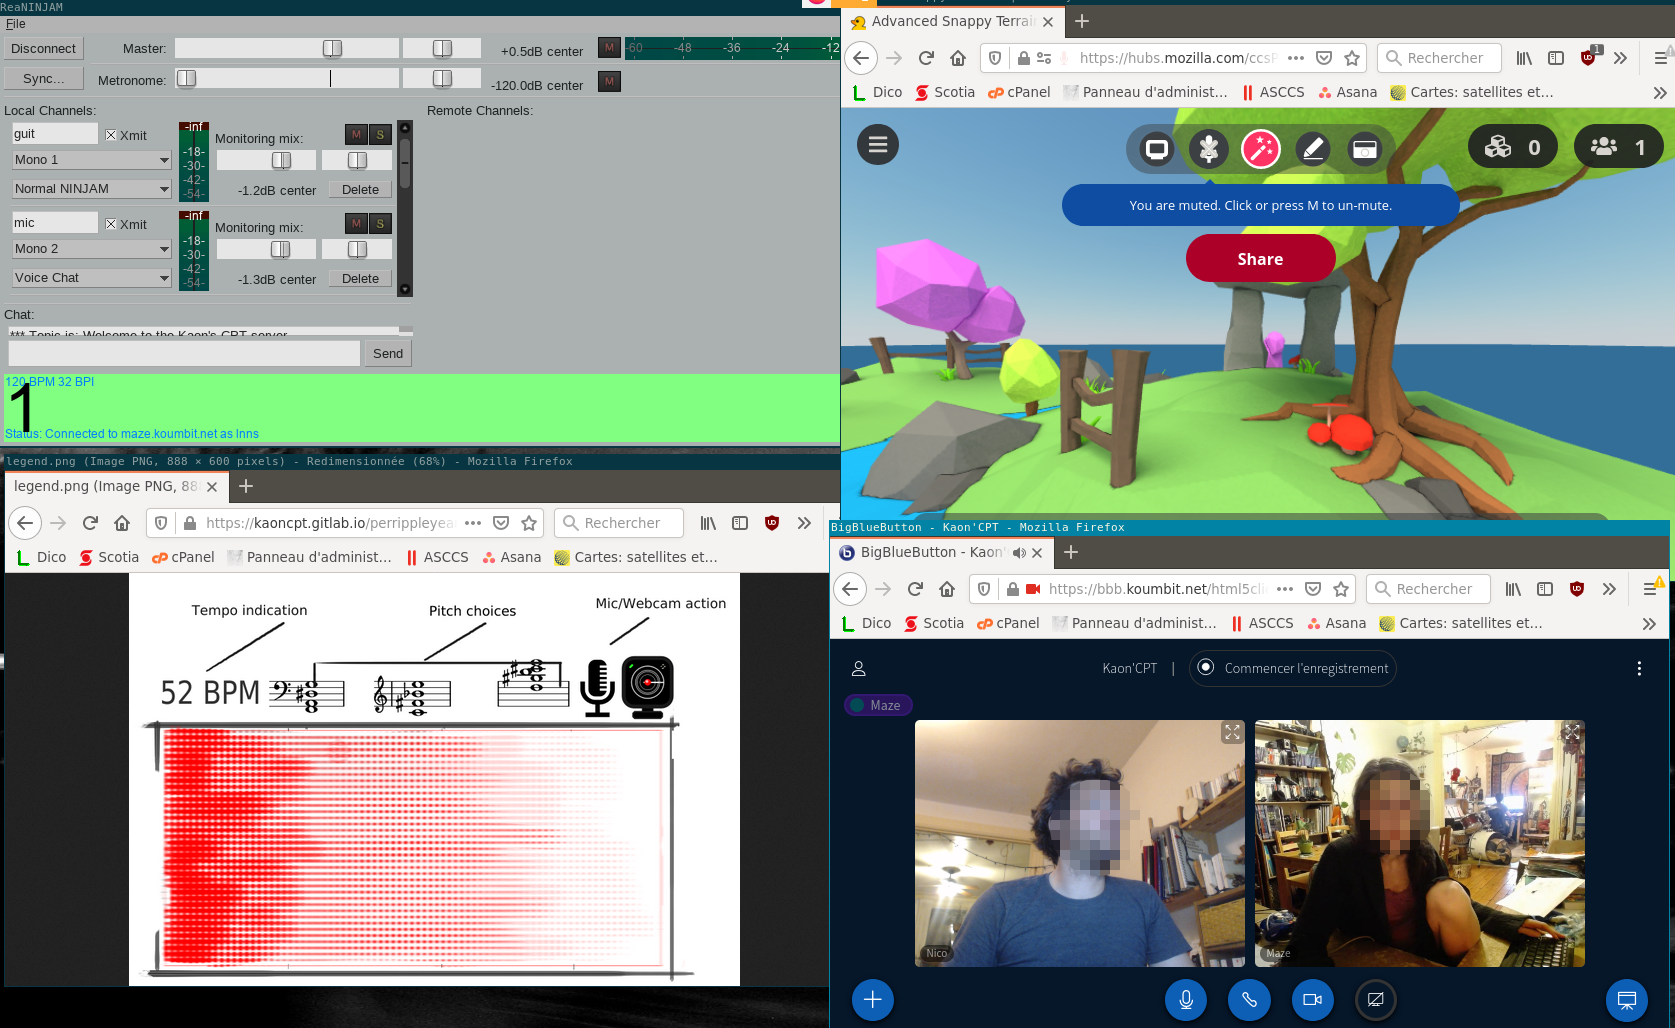
Here is a suggested window disposition for a single screen:
 where :
- upper left is the ninjam window from reaper
- upper right if the hubs window
- lower left is the score
- lower right is the bbb videoconferencing window
Audio video pipeline for the mix
Other software for audio video mix:
- OBS for streaming to an online live streaming service (twitch)
- SoundDraw That provides a visualization of the music. SoundDraw
The Challenges are the following:
- adjust the audio volume of each channel in order to balance the global
- sync the video mosaic from bbb with the audio from reaper. Actually, audio from reaper will be late from approximately the delay imposed by the score.
- mix the 3D videos for streaming to a twitch feed that will be displayed in the hubs. Alternatively, it can be several live stream displayed simultaneously in the hubs
Here is the pipeline if only one person is in charge of the mix:
                                            ----------
                                           | OBS      |
Reaper -- audio -------------------------> | scene 1  |
bbb    -- video mosaic --> video delay --> |          |
                                           |          |-- Mix --> twitch --> Hub
hubs   -- 3D virtual world --------------> | scene 2  |
                                           |          |
score  --------------------------------- > | scene 3  |
                                           |          |
Reaper -- audio --> soundDraw -- video --> | scene 4  |
                                            ----------
Installation
- download Reaper for your system
Linux
Once you've extracted the .tar.gz, you can either install it in your system by running install-reaper.sh, or run it directly. e.g: reaper_linux_x86_64/REAPER/reaper
MacOS / Windows
To install reaper on MacOS or Windows, check the Reaper's user guide (section 1 - "Setting Up and Getting Started")
Configuration
Reaper + Ninjam
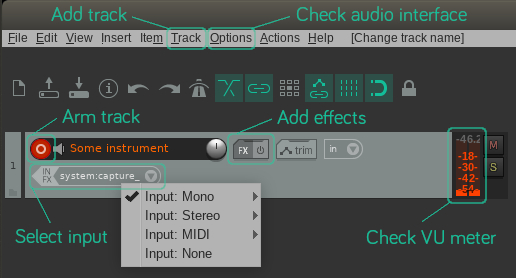
Once you've launched reaper, make sure the right sound interface is configured:
- in the menu, go to options > preferences (CTRL+P)
- in the left menu, click on device under Audio
- Choose the right interface in the Audio system menu
Using one channel
- Create a new track (Track > insert new track or CTRL+T)
- Arm the track
- Choose your input in the IN/FX box at the bottom left of the track and make sure the VU meter on the right reacts
- Click on FX next to the track name to connect the track to the ninjam server, 2 windows open:
- in the Add FX to window, select VST: ReaNINJAM (under _All plugins > Cockos)
- keep the new window open, it is the ninjam server window (ReaNINJAM)
- close the FX: track name window
- make sure the VU meter of your local channel in the server window reacts correctly
- Connect the the server by clicking Connect... at the top left corner
- enter the ninjam server IP or host name
- enter your username and password
- click connect, and accept the licence

Using multiple channels
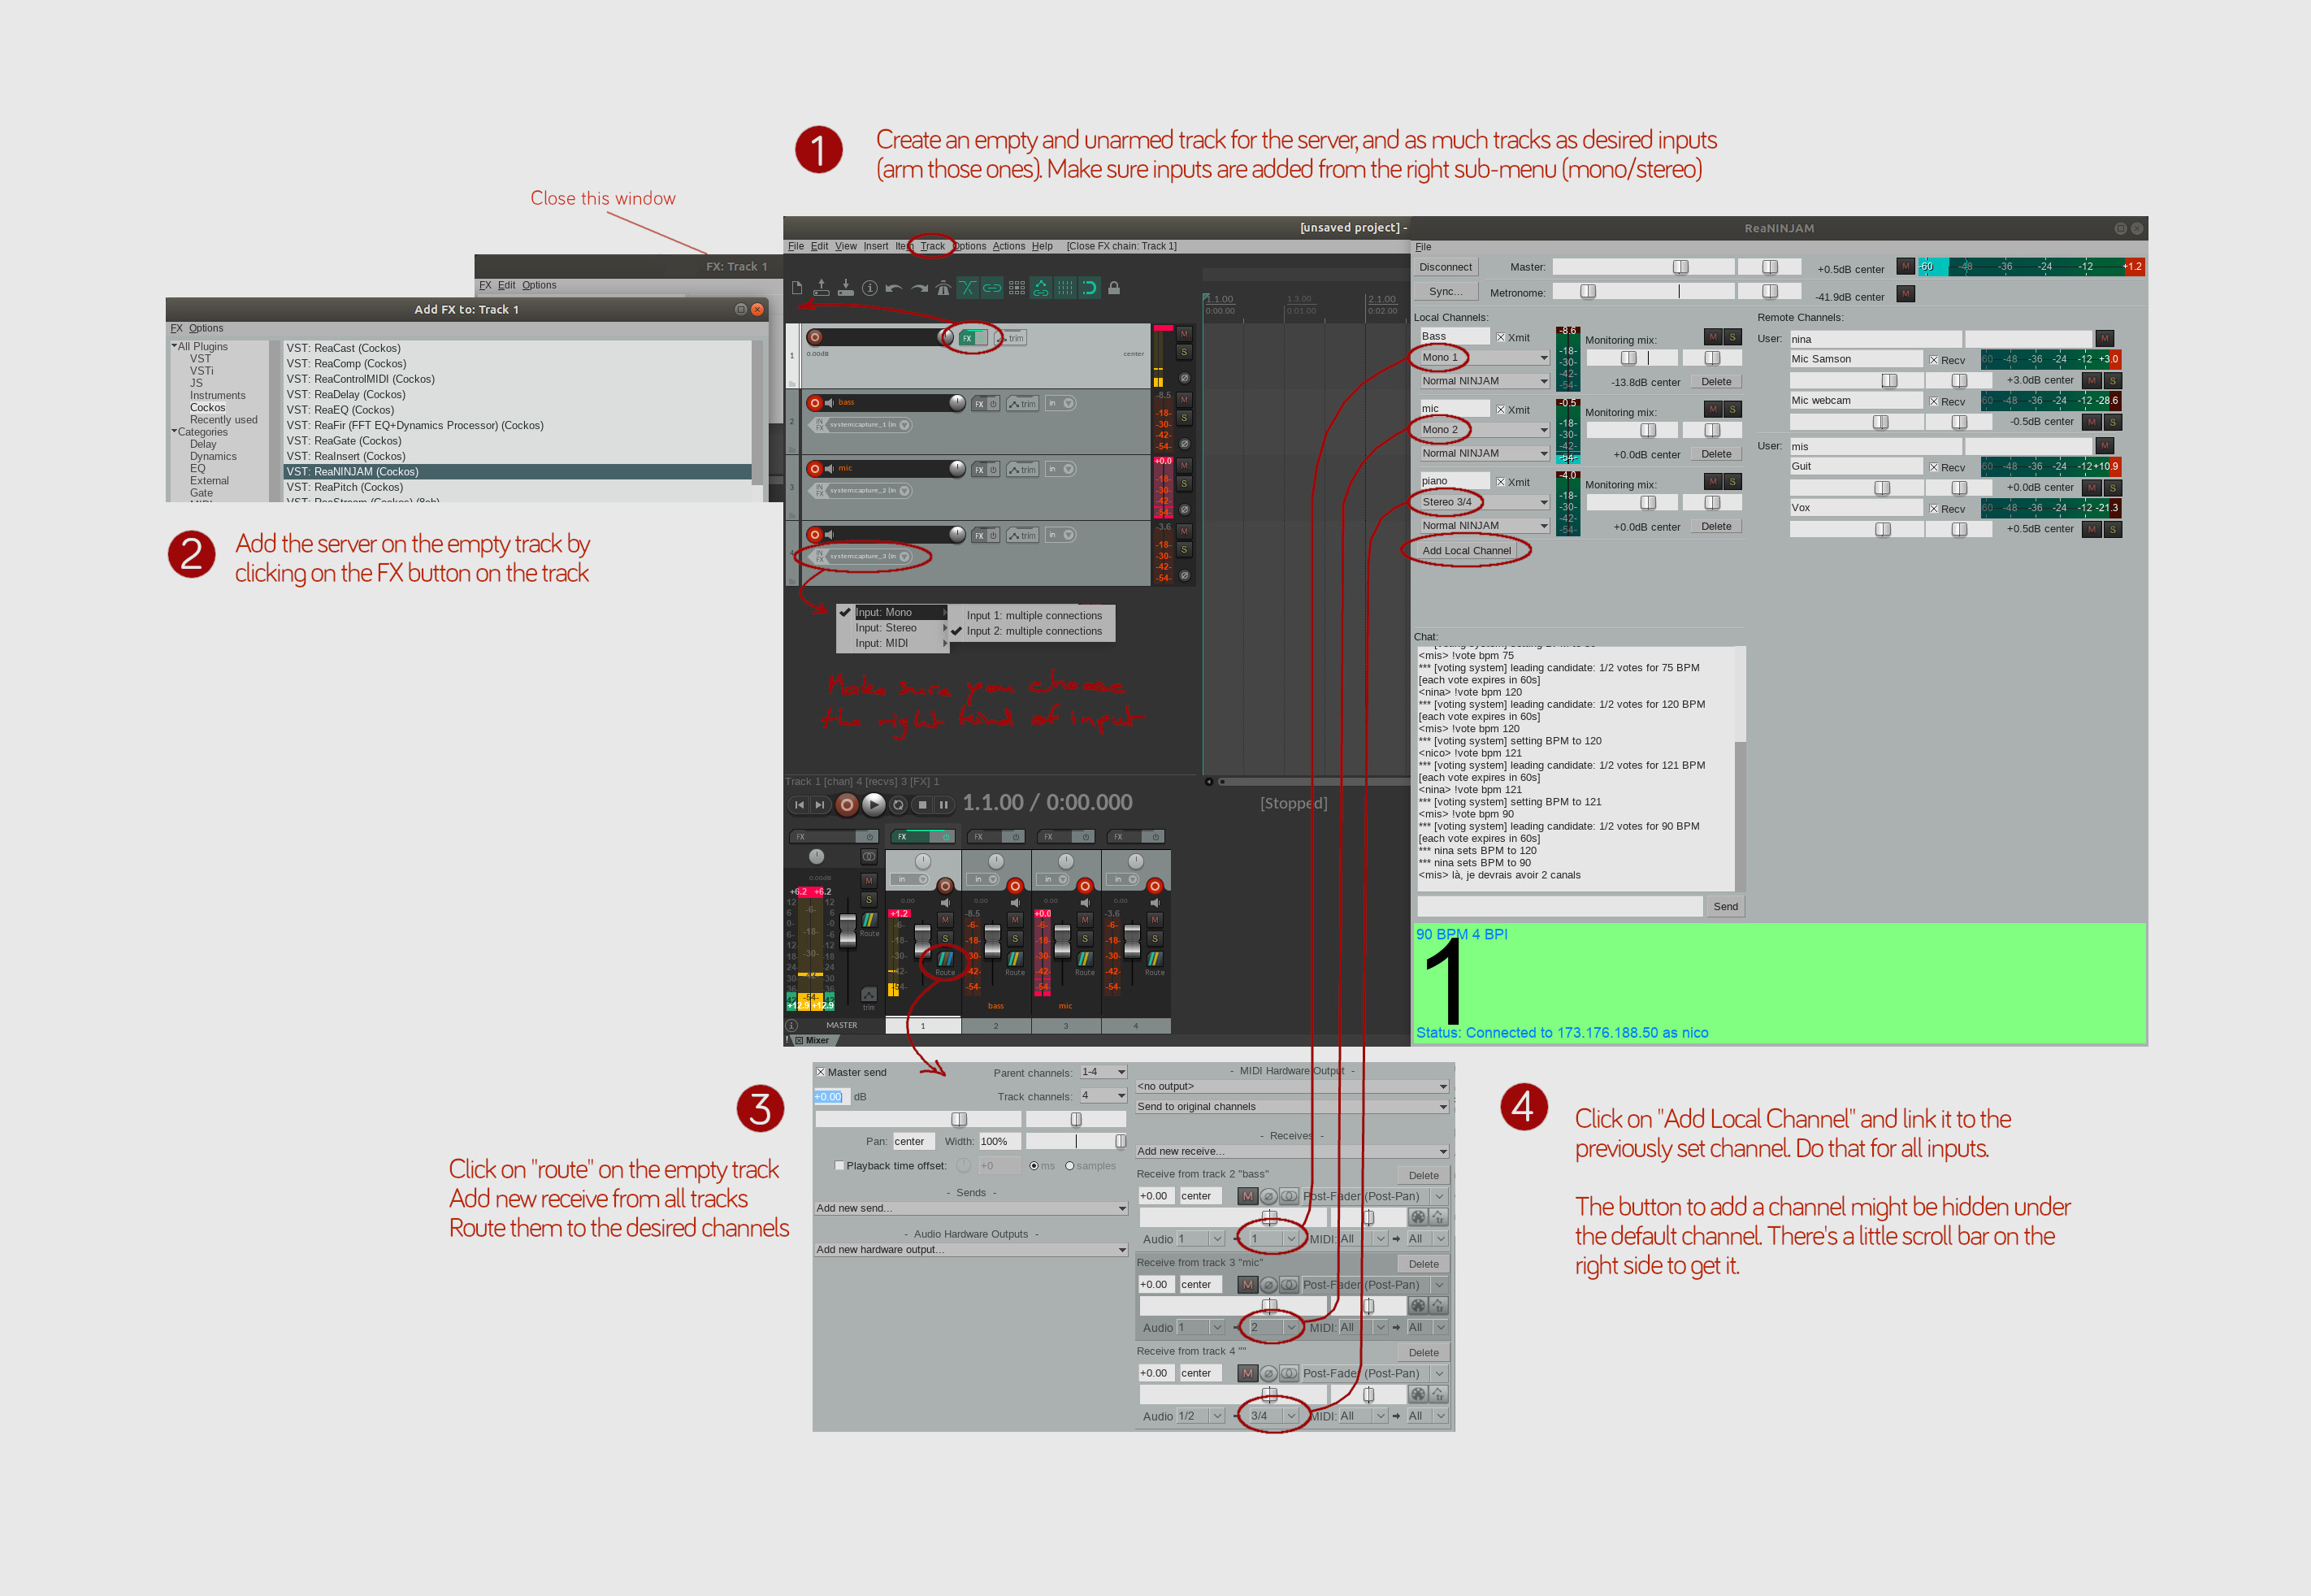
- Create as much tracks as inputs (Track > insert new track or CTRL+T)
- Arm each track
- Choose your input in the IN/FX box at the bottom left of each track
- Make sure each VU meter on the right reacts correctly for the desired input
- Create an additional track which will be used to connect with the Ninjam server (do not arm it)
- At the bottom of Reaper's window, click on the route button of the additional track
- In the new window, select Add new receives... and chose "Add new receives from all tracks"
- Check that tracks channels for receiving track don't overlay (e.g.: mono 1 and stereo 1/2)
- Click on FX next to the additional track name
- in the Add FX to window, select VST: ReaNINJAM (under _All plugins > Cockos)
- keep the new window open, it is the ninjam server window (ReaNINJAM)
- close the FX: track name window
- Configure your channels in the server window:
- click on Add Local Channel (you may need to scroll a bit to see it)
- name your channels
- choose the source defined in the route window
- choose Normal NINJAM to use the server synchronization
- make sure the VU meters reacts accordingly to the expected configuration

Hubs
- avatar
- microphone/camera